fbpx

DIY Shrink Plastic Barrettes: a Step by Step Tutorial

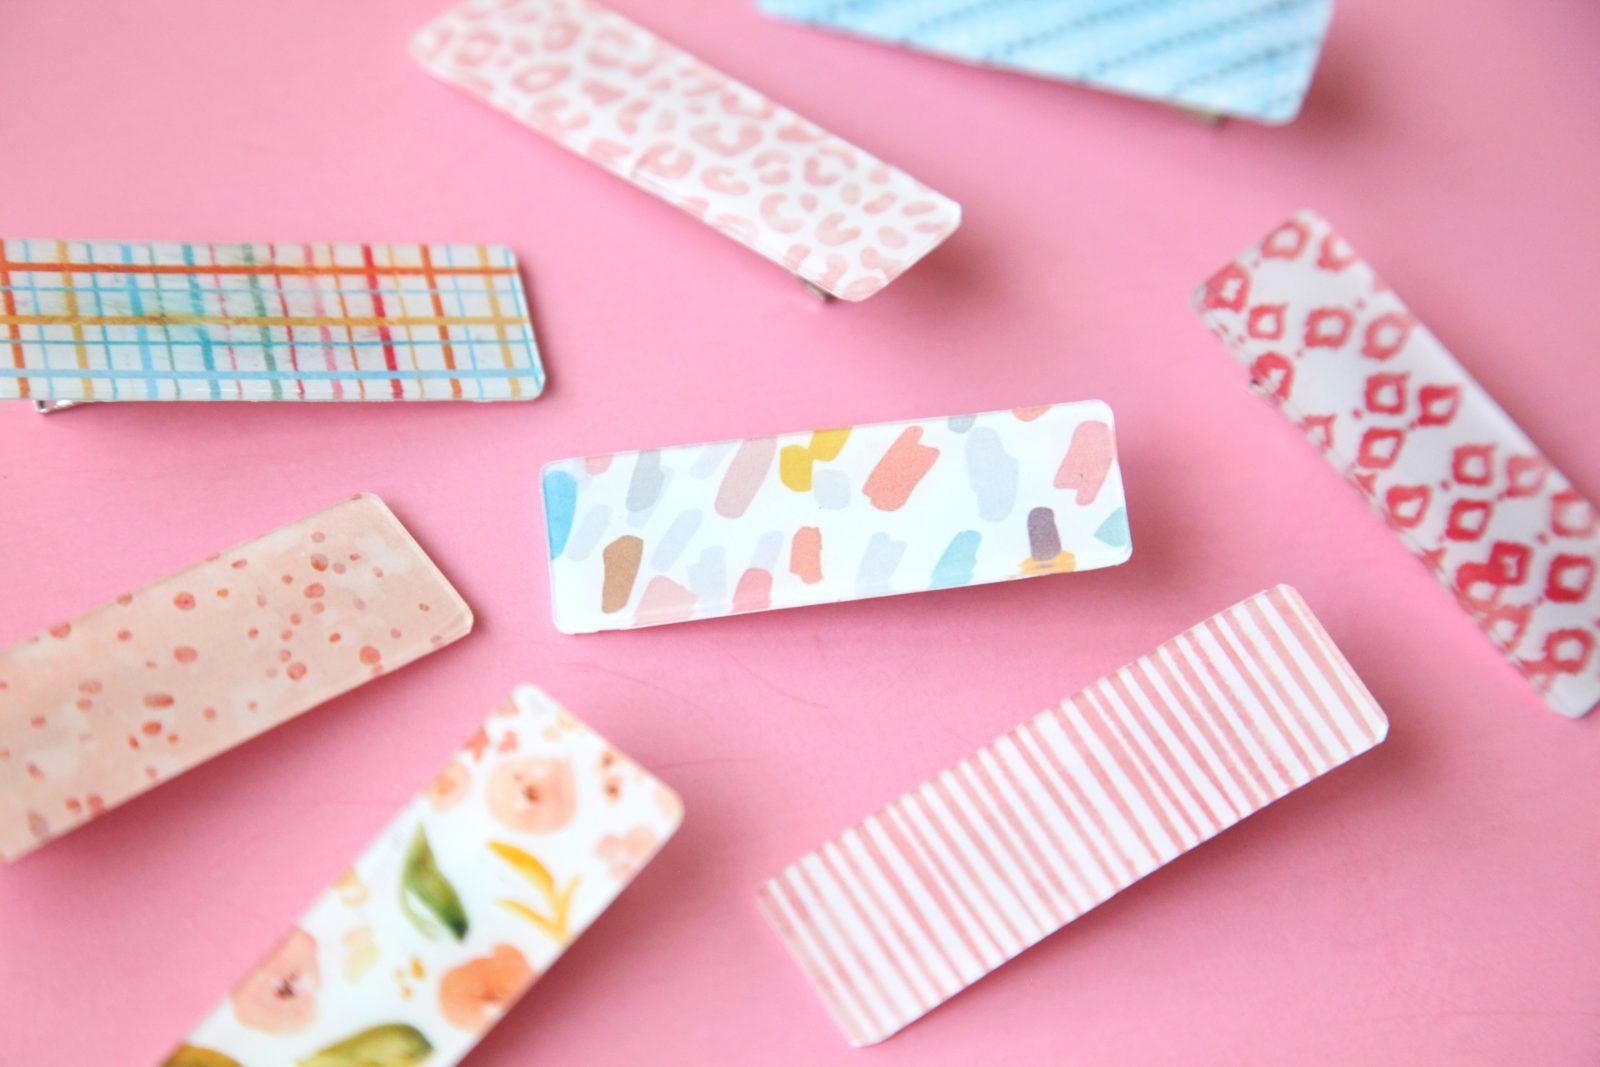
These DIY Shrink Plastic Barrettes are sponsored by Silhouette. All opinions are ours alone. This post may contain affiliate links, which help us support this site. Here at the PLG we have certainly gone a little barrette crazy over the last year, not only because they are the cutest accessory, but because they are so...

Add a comment...

Your email is never published or shared. Required fields are marked *

  • coletteMay 21, 2020 - 3:36 pm

    I don’t know how to do the silhouette part. Where can I find more instruction on that?
    These are super cute and i really want to make some.ReplyCancel

    • prettylifegirlsMay 26, 2020 - 9:28 am

      Hi Colette! I would recommend looking at these tutorials for more detailed instruction: https://www.silhouette101.com/?s=shrink+plastic. Good luck!ReplyCancel

    • prettylifegirlsJuly 27, 2020 - 8:03 am

      Hi Colette!

      Do you have a Silhouette machine? If so, where are you getting stuck? I would be happy to send more detailed instructions if the blog post isn’t enough. If not, you can cut these by hand!

      -SamReplyCancel

  • ValérieMay 23, 2020 - 11:39 pm

    Bonjour,
    Je découvre vos DIY et j’adore ! Merci pour le temps passé à nous expliquer tous ces beaux modèles ???????????? je like les barrettes ❤️❤️❤️ et je vais essayer avec ma fille.
    Merci merci beaucoup ????ReplyCancel

  • CobsJune 28, 2020 - 1:11 am

    What are the dimensions of each barrette that you used?ReplyCancel

    • prettylifegirlsJuly 27, 2020 - 8:00 am

      Mine were about 8 inches long and 2.5 inches wide for printing!ReplyCancel

  • Amy PadillaJuly 24, 2020 - 10:32 am

    Hello,
    I’m curious about the cut settings you used on the Cameo. Did you use a cutting mat, or a special blade? I really want to make some of these for my family!ReplyCancel

    • prettylifegirlsJuly 27, 2020 - 7:59 am

      Hi Amy!

      I used a normal ratchet blade, and Silhouette Studio has shrink plastic in the materials list! But for reference, these are the settings: Blade-6, Force-33, Speed-1, Passes-2. I hope this helps! Send us a picture if you make some!

      -SamReplyCancel

      • Amy PAugust 10, 2020 - 4:28 pm

        Hi Sam,
        Thanks for answering my question! I have some of the old fashioned Shrinky Dink material, and it is not cutting well, which is a real bummer, but I am hoping to try with the Kraft blade in my carriage 2 on my Cameo 4. I will send pictures if I get it to work, along with the (hopefully) successful cut settings.ReplyCancel

Unique Mother’s Day Gift Ideas: DIY Bath Salts and Customized Jar

Today I’m sharing a fun project using my beloved Silhouette CAMEO! Give the mothers in your life the gift of luxury and relaxation with these gorgeous DIY bath salts and customized jars. This is the perfect Mother’s Day gift and is thoughtfully and lovingly made (just what any mom wants) and personalized using adhesive vinyl...

Add a comment...

Your email is never published or shared. Required fields are marked *

    Craft Tutorial: How to Make Clay Trinket Dishes for Kids

    Are your kids little treasure hunters? Mine are. They can find a rock, coin or a piece of glass or plastic that only slightly resembles a crystal and be certain it is the most valuable thing they have ever laid eyes on. Then, we have to find just the right place to keep it safe...

    Add a comment...

    Your email is never published or shared. Required fields are marked *

      How to Melt Crayons in Silicone Molds: A Step by Step Craft Tutorial

      This post was originally published in April 2020 and updated as of April 2022. Today, I’m going to share how to melt crayons in silicone molds! I saw this idea on the internet during a desperate search for things I could do to entertain my kids, and was thrilled since I had everything I needed...

      Add a comment...

      Your email is never published or shared. Required fields are marked *

      • Stacy JJanuary 25, 2021 - 3:23 pm

        I have made melted crayons in molds a few years ago. I couldn’t remember what temperature so your site was the top on the list. I put them in the oven and it melted my mold. I was so disappointed. I make my students crayon brains when we learn about it in science. I looked at 4 other posts after this disaster and they all had the temps at 200 to 250 degrees. So 350 is much too hot and melts the mold.ReplyCancel

        • prettylifegirlsJanuary 25, 2021 - 5:45 pm

          Stacy – I’m so sorry to hear that! We’ve never had any problems with molds melting, so maybe your molds are made of a different material! I will add a note to the post.ReplyCancel

      Easter Crafts for Toddlers: Painted Pasta Easter Egg Art

      If you made our last kiddo project (these pretty pasta necklaces) then you probably have some leftover painted pasta sitting around just waiting to get crafty! So, why don’t we make a darling Easter themed project that will put all of that colorful pasta to CUTE use!? Today we’re making painted pasta Easter egg art!...

      Add a comment...

      Your email is never published or shared. Required fields are marked *

        Easy Crafts for Toddlers: Painting Pasta Necklaces

        I’ll admit, when all of the news about Covid-19 started to hit, I got a little spooked and bought a bunch of extra dried foods to fill up our pantry. This included loooots of dried beans and pasta and all the chocolate chips because, desperate times, ya know? So, now that we are deep into...

        Add a comment...

        Your email is never published or shared. Required fields are marked *

        • Jennifer HockenberryOctober 25, 2021 - 5:32 am

          Such cute ideas! My two little girls, my husband and myself are all home with covid and I’m trying to find some fun things for us to do together while not getting out much. Thank you for the pretty suggestions!ReplyCancel

          • prettylifegirlsOctober 25, 2021 - 8:22 am

            Oh no! We’re so sorry to hear that! We hope you are all feeling ok!ReplyCancel

        How to Make DIY Unicorn Bubbles: A Step by Step Tutorial

        This post was originally published in April 2020 and updated as of May 2023. Unicorn bubbles are full of color, smell wonderful, and the kids can’t get enough of it! Add some toys or just let them enjoy the feeling of the bubble foam! How to Make DIY Unicorn Bubbles: A Step by Step Tutorial...

        Add a comment...

        Your email is never published or shared. Required fields are marked *

        • PamJune 1, 2021 - 1:37 pm

          will the kids skin get stained with the food coloring in the foam?ReplyCancel

          • prettylifegirlsJune 1, 2021 - 1:45 pm

            Nope! I think the soap counteracts the coloring!ReplyCancel

        Easter Crafts: How to Dye Eggs Naturally with Onion Skins

        My husband spent many of his teenage years living abroad in Germany and while living there his family picked up a lot of wonderful holiday traditions. One of my favorite traditions is to dye eggs naturally with onion skins, and now that my kids are a little older, it’s been so fun to continue this...

        Add a comment...

        Your email is never published or shared. Required fields are marked *